
 2179
2179
Typical LED order by process
The following is the typical order for the SkyBell Doorbell Camera LED to go through during different processes (i.e., first bootup, enrolling, etc.).
First bootup
When the SkyBell Doorbell Camera is first powered on, the LED typically goes through the following cycle:
- Solid yellow
- Blue/red (Charging)
- Green/red (AP mode ready)
Enrollment
When the SkyBell Doorbell Camera is enrolled to a customer's account, the LED typically goes through the following cycle:
- Green/red
- Blinking orange (at 10% of install)
- Blue/green
- Green (Connected)
Button hold
When the SkyBell Doorbell Camera's button is held down, the LED typically goes through the following cycle:
- Blinking green - When released during this state, the Doorbell Camera goes to blinking green/red for AP mode
- Green/red - When released during this state, the Doorbell Camera stays in AP mode
- Blinking blue - When released during this state, the Doorbell Camera power cycles
- Blinking yellow - When released during this state, the Doorbell Camera factory resets
Factory reset
When the SkyBell Doorbell Camera's button is reset to factory defaults, the LED typically goes through the following cycle:
- Blinking yellow
- Blinking orange
- Solid yellow
- Green/red (AP mode ready)
Normal power cycle
When the SkyBell Doorbell Camera's button is power cycled (assuming that it is enrolled to the customer's Wi-Fi), the LED typically goes through the following cycle:
- Blinking blue
- Solid yellow
- Blinking orange, or Blue/green
- Solid green (Connected)
SkyBell HD Wi-Fi Doorbell Camera LED and troubleshooting reference guide
LED pattern key

Normal operation
| LED pattern | Description | Details |
|---|---|---|
 |
Ready and working normally | Use the Alarm.com app or Customer Website to choose a custom color in place of default green. |
 |
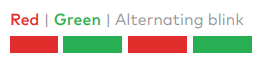
In Call mode |
A call has been initiated (i.e., the doorbell button was pressed or the doorbell detected motion) or is occurring. |
 |
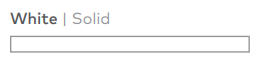
Starting up | Please wait while the doorbell is booting up. |
 |
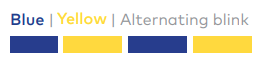
Battery is charging | Battery may charge for ~30 minutes after installation. |
 |
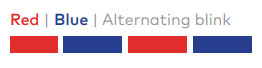
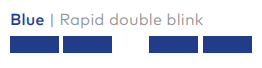
Connected to Wi-Fi, waiting for server connection | Please wait. |
 |
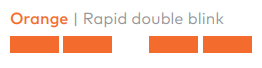
Firmware update in progress | Please wait. |
Requires attention
| LED pattern | Description | Details |
|---|---|---|
 |
No Wi-Fi connectivity | Check your Internet connection. Your Wi-Fi credentials may have changed. Enter Wi-Fi Access Point Mode (see Troubleshooting) and re-add the doorbell camera using the app. |
 |
Power supply issue | Contact your installer. The doorbell transformer may need to be replaced. |
Troubleshooting
Press and hold doorbell button for the time shown to perform a troubleshooting step.
Note: If the LED on the doorbell is not showing any color, there may be a power issue or it may have been turned off in the Video Settings on the Customer Website.
| LED pattern | Description | Details |
|---|---|---|
 |
Entering Troubleshooting modes | Continue to press & hold for troubleshooting steps below. |
 |
Wi-Fi Access Point mode | Connect to the camera’s temporary network and use the app to re-add the camera. Push & hold ~60 sec until flashing, then release. |
 |
Power cycle | Reboots the camera. Push & hold ~70 sec until flashing, then release. |
 |
Factory reset | Factory resets the camera. Deletes all Wi-Fi and configuration information. Push & hold ~80 sec until flashing, then release. |
Slim Line Wi-Fi Doorbell Camera LED and troubleshooting reference guide
LED pattern key

Normal operation
| LED pattern | Description | Details |
|---|---|---|
|
Ready and working normally | Use the Alarm.com app or Customer Website to choose a custom color in place of default green. |
|
In Call mode | A call has been initiated (i.e., the doorbell button was pressed or the doorbell detected motion) or is occurring. |
 |
Starting up | Please wait while the doorbell is booting up. |
 |
Battery is charging | Battery may charge for ~30 minutes after installation. |
|
Connected to Wi-Fi, waiting for server connection | Please wait. |
|
Firmware update in progress | Please wait. |
Note: Once the outside temperature reaches roughly -10 degrees Fahrenheit, the doorbell camera rings the chime quickly twice in a row.
Requires attention
| LED pattern | Description | Details |
|---|---|---|
|
No Wi-Fi connectivity | Check your Internet connection. Your Wi-Fi credentials may have changed. Enter Wi-Fi Access Point Mode (see Troubleshooting) and re-add the doorbell camera using the app. |
 |
Power supply issue | Contact your installer. The doorbell transformer may need to be replaced |
Troubleshooting
Press and hold doorbell button for the time shown to perform a troubleshooting step. For more information about specific troubleshooting steps, see the How-to troubleshooting guides in SkyBell Doorbell Cameras.
| LED pattern | Description | Details |
|---|---|---|
|
Entering Troubleshooting modes | Continue to press & hold for troubleshooting steps below. |
|
Push & hold ~60 sec until flashing, then release. |
Wi-Fi Access Point mode | Connect to the camera’s temporary network and use the app to re-add the camera. |
|
Push & hold ~70 sec until flashing, then release. |
Power cycle | Reboots the camera. |
|
Push & hold ~80 sec until flashing, then release. |
Factory reset | Factory resets the camera. Deletes all Wi-Fi and configuration information. |


